01 — Overview
Rule Maker is an automation rule builder within the VIRTEST Observability platform. It enables telecom test engineers to create event-driven rules, when a specific condition is met during a test run, trigger a specific action on a piece of equipment, no scripting required.
A rule consists of three parts: an Event (the trigger), a Condition (the logic that determines whether the action fires), and an Action (what happens to which equipment). Rules can be scoped to a workspace, a specific campaign, or individual test cases, and published to a shared library for reuse across teams.
The challenge was designing a system complex enough to handle real operational requirements, nested logic, multi-parameter actions, version-controlled publishing, while remaining approachable to engineers who aren't developers.
02 — The Problem
Telecom testing environments are dynamic. A test that passes under one set of network conditions may fail under another, and engineers needed a way to respond to those conditions automatically, without human intervention during a test run.
The existing approach was scripting (engineers wrote code to handle conditional equipment actions). This created bottlenecks: only engineers comfortable with scripting could create automation, rules were hard to share and reuse, and debugging a failed rule required reading code rather than inspecting logic.
The design brief was to build a decision-making environment ,a structured editor where the logical structure of a rule is always visible, always editable, and never requires guessing what the rule actually does.
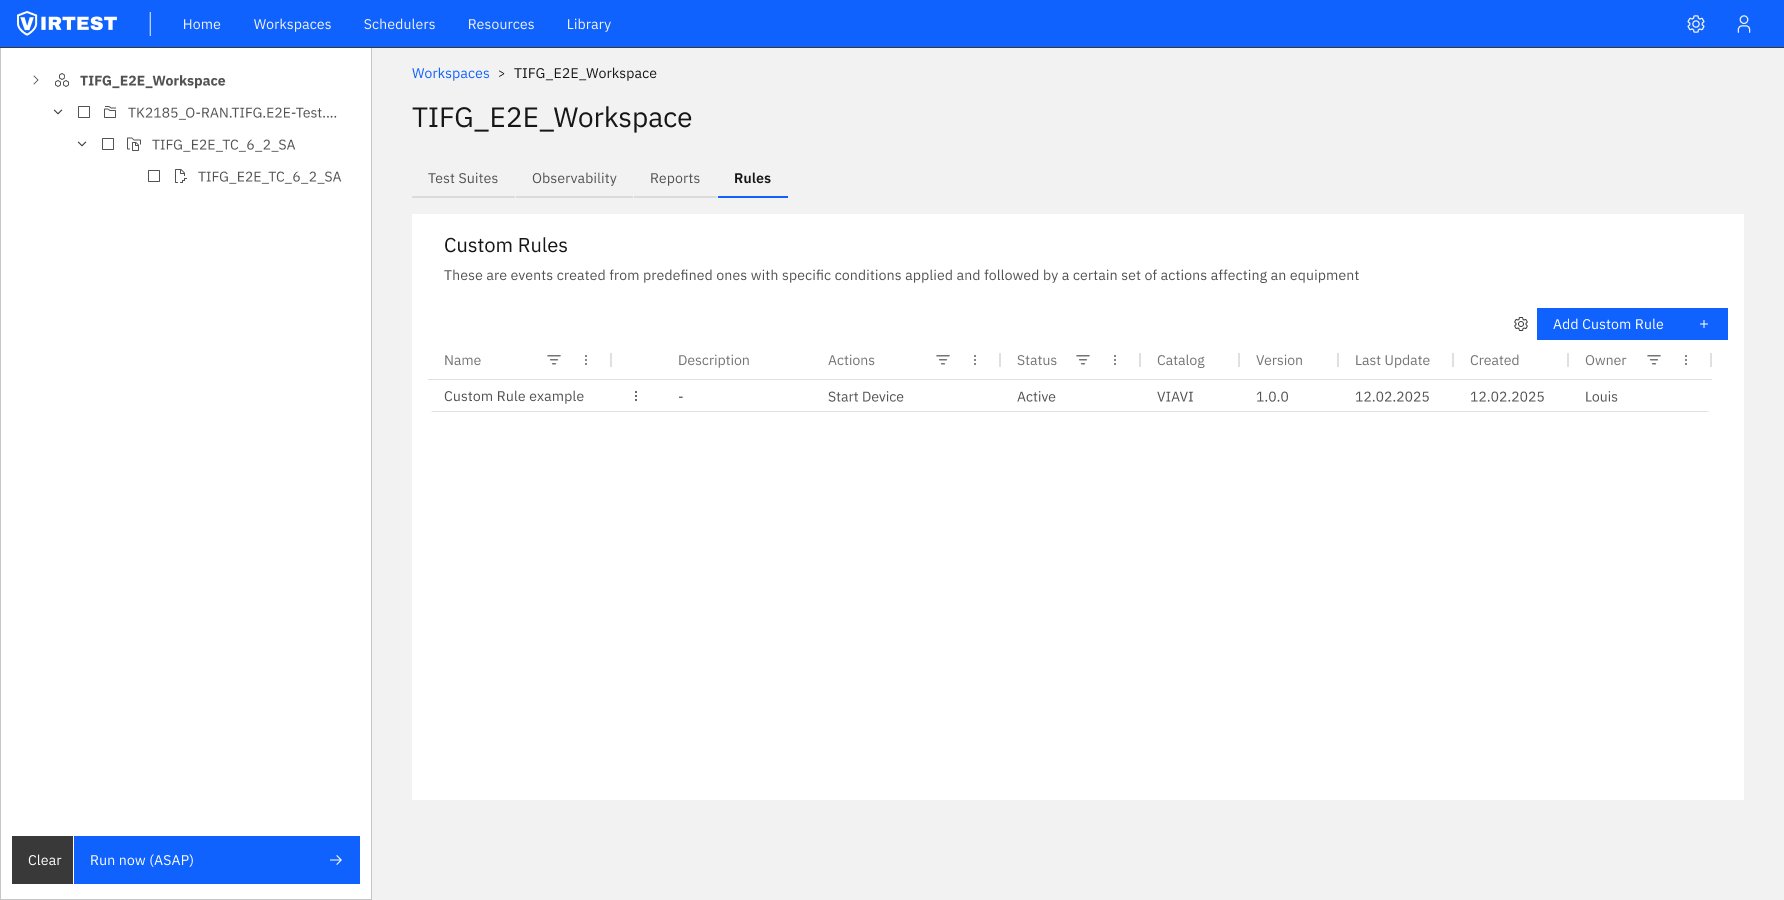
Entry point - Custom Rules table at workspace level. Rules are visible and manageable from both the workspace (global scope) and individual test case level. Status, Actions, Catalog, and Owner visible at a glance.
03 — The 4-Step Flow
The editor restructures rule creation into a sequential four-step process. Each step is conceptually discrete, users can't jump ahead without completing the current step, which prevents configuration errors and ensures logical coherence.
01
Select Event (Trigger)
The first and mandatory step. Engineers select a predefined event from the Events tab, double-click or drag it onto the canvas. Only one event per rule is allowed, enforcing a single trigger per automation. Once selected, the Event section expands showing a read-only parameter table (Frequency, Cell ID, MIMO Option, Interface Mode, Signal Power, Bandwidth etc.). The editor automatically advances to the Variables tab.
02
Configure Variables & Condition
The Variables tab lets engineers select which KPI variables are available in the condition builder. Only checked variables appear in the condition dropdowns, reducing noise and preventing errors from selecting irrelevant metrics. The condition builder uses an IF / IF NOT / ALWAYS selector followed by a query-builder pattern: AND/OR logic with variable rows, operator dropdowns, and value inputs. Engineers can nest conditions and add multiple variable lines.
03
Define Actions & Equipment
Engineers select which equipment the action targets (Toyo Sniffer, Asset Tester, TM500 tester, Nokia DU, DUT asset etc.) then choose the action type: Start Agent, Stop Agent, Start Device, Stop Device, or Execute Script/Command. Each action type exposes its own parameter set, editable as free input, dropdown, or via a "Use variable" checkbox that substitutes a live KPI value. Advanced options include Event Blocking (pauses the flow until complete) and Sequential execution (finishes before the next action).
04
Settings, Save & Publish
The Settings tab handles rule metadata: version (1.0.0 format), catalog (VIRTUAL or custom), and scope, which campaigns and test cases this rule is active for. The Save vs Publish distinction is deliberate: Save stores the rule locally in the workspace. Publish pushes it to the shared library. The Publish button only activates when the rule is fully valid, providing implicit validation feedback without error messages.
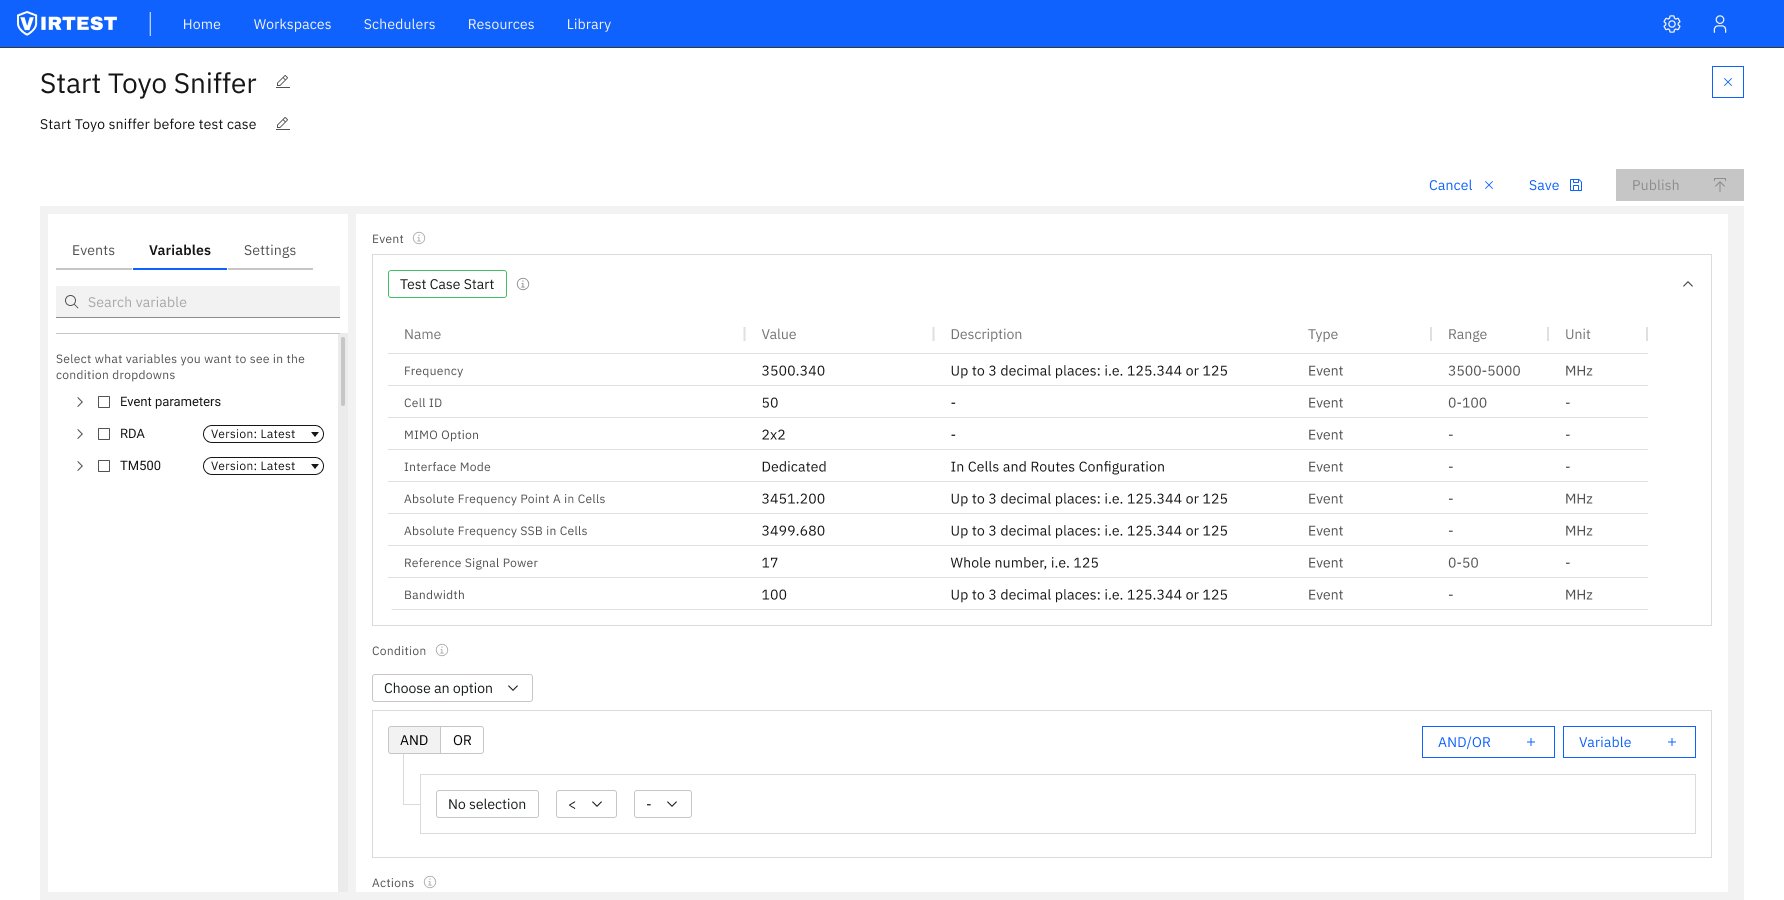
Variables tab: "Test Case Start" event expanded showing full parameter table. Frequency (3500.340 MHz), Cell ID (50), MIMO (2x2), Interface Mode (Dedicated), bandwidth values. Condition builder below with initial empty state.
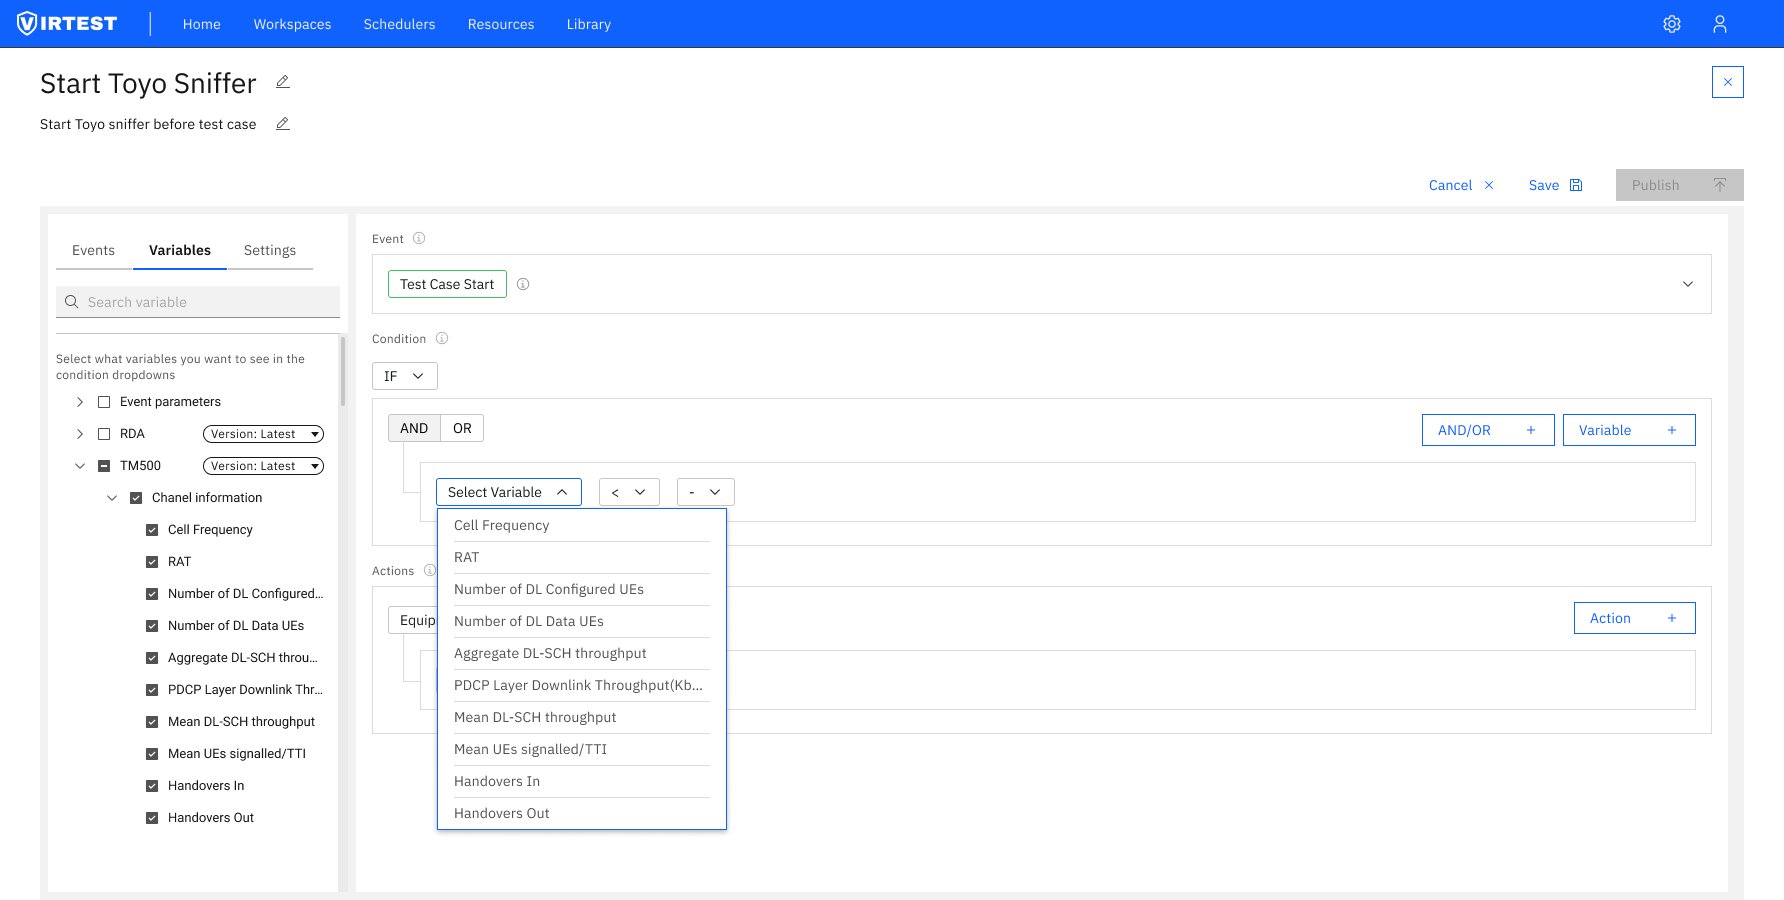
Variable selection: TM500 Channel information expanded and checked. Condition builder's Select Variable dropdown shows only the checked variables: Cell Frequency, RAT, Number of DL Configured UEs, Aggregate DL-SCH throughput, and more.
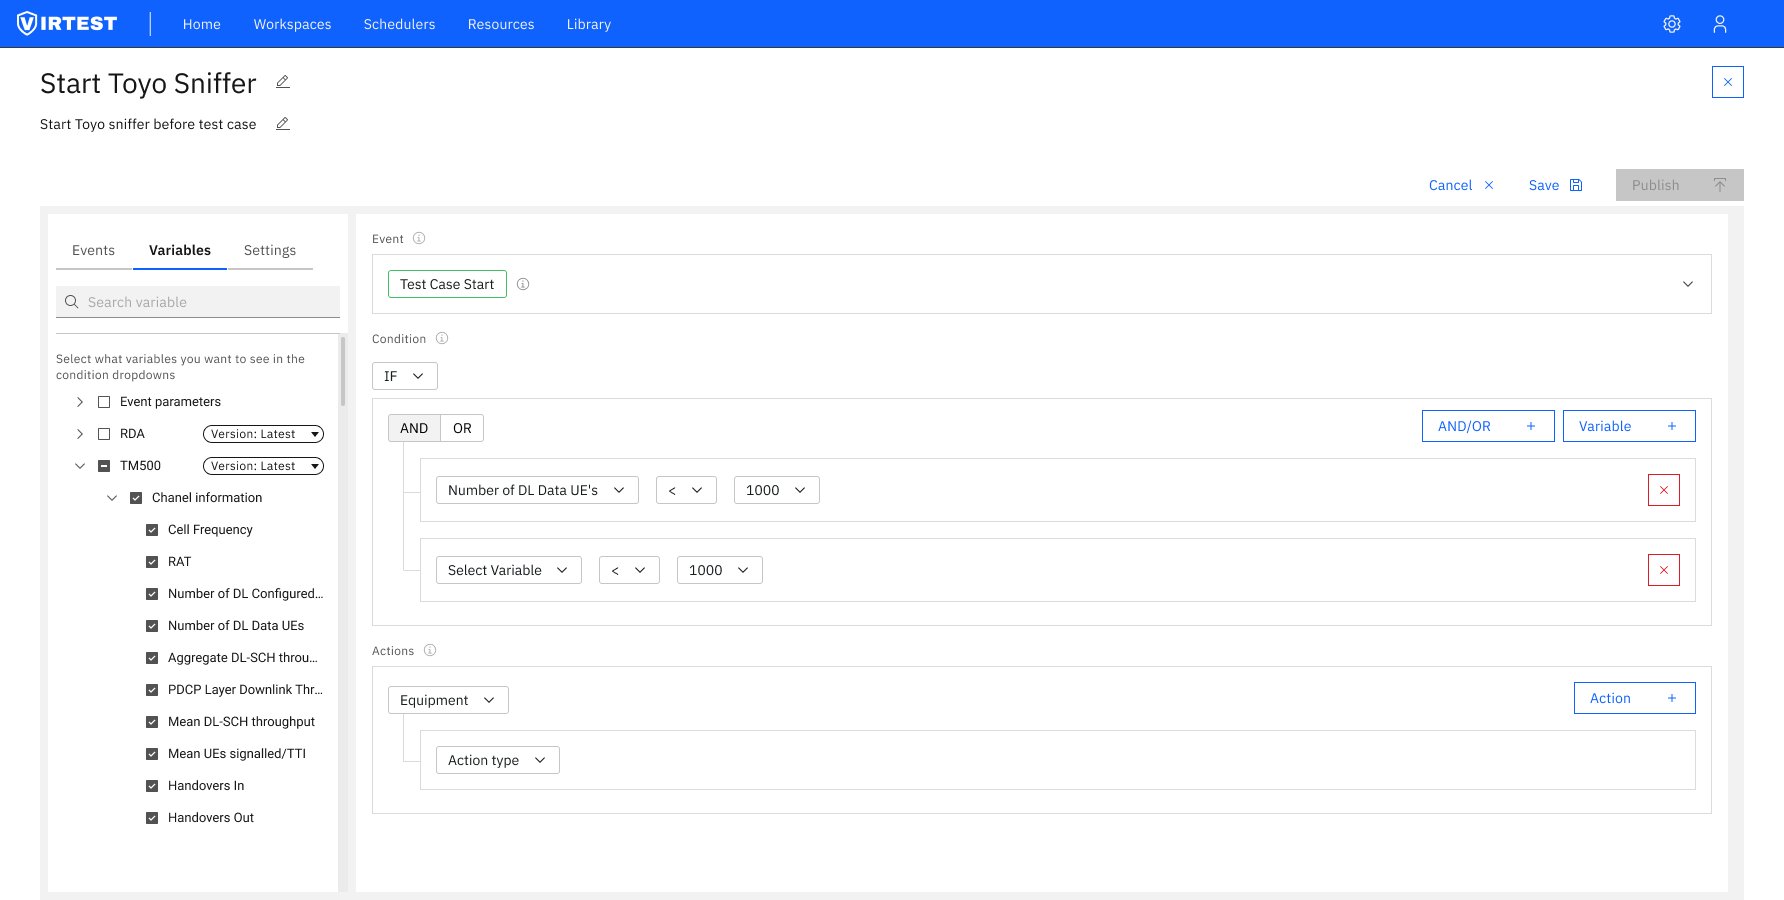
Condition built: "Number of DL Data UEs < 1000" AND a second variable condition. Actions section below ready for equipment and action type selection.

Equipment dropdown: the full list of available equipment in this lab: Toyo Sniffer, Asset Tester, Core 1 rack, DUT asset, RDA rack, TM500 tester, Nokia DU. Only lab-configured equipment appears here.
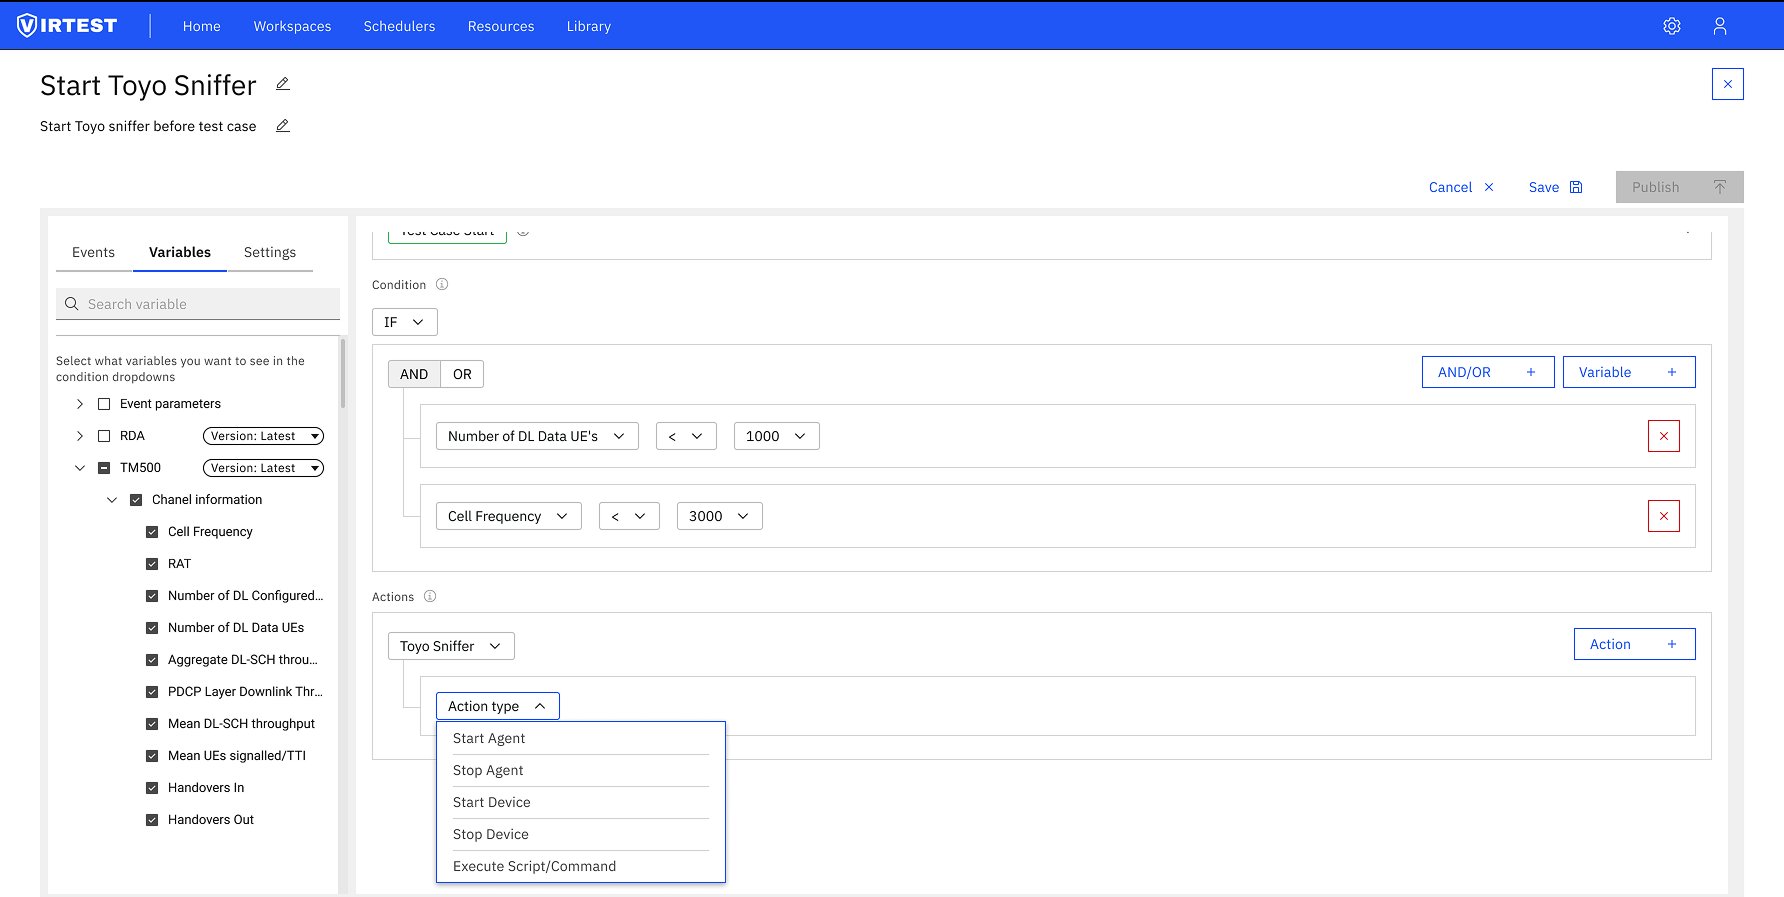
Action type selection: five action types available: Start/Stop Agent, Start/Stop Device, Execute Script/Command. Each exposes a different parameter set depending on the equipment and action chosen.
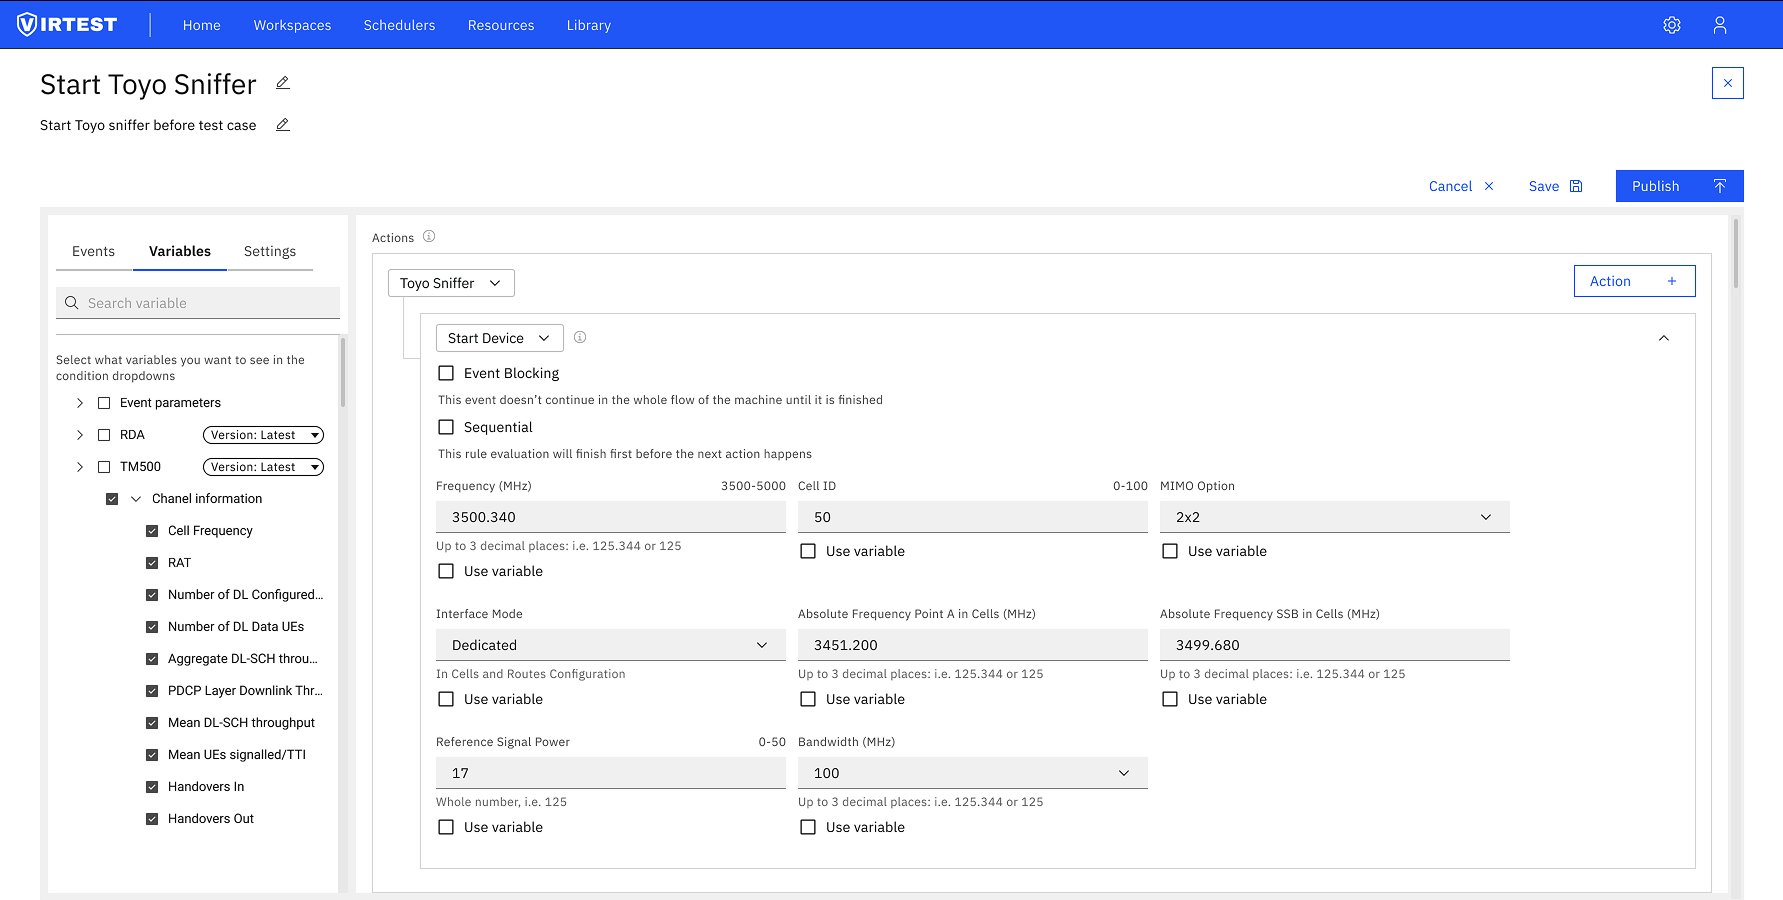
Fully configured action: Start Device with all parameters populated. "Use variable" checkboxes allow each field to reference a live KPI value instead of a static input. Publish button is now active (blue), indicating the rule is valid.
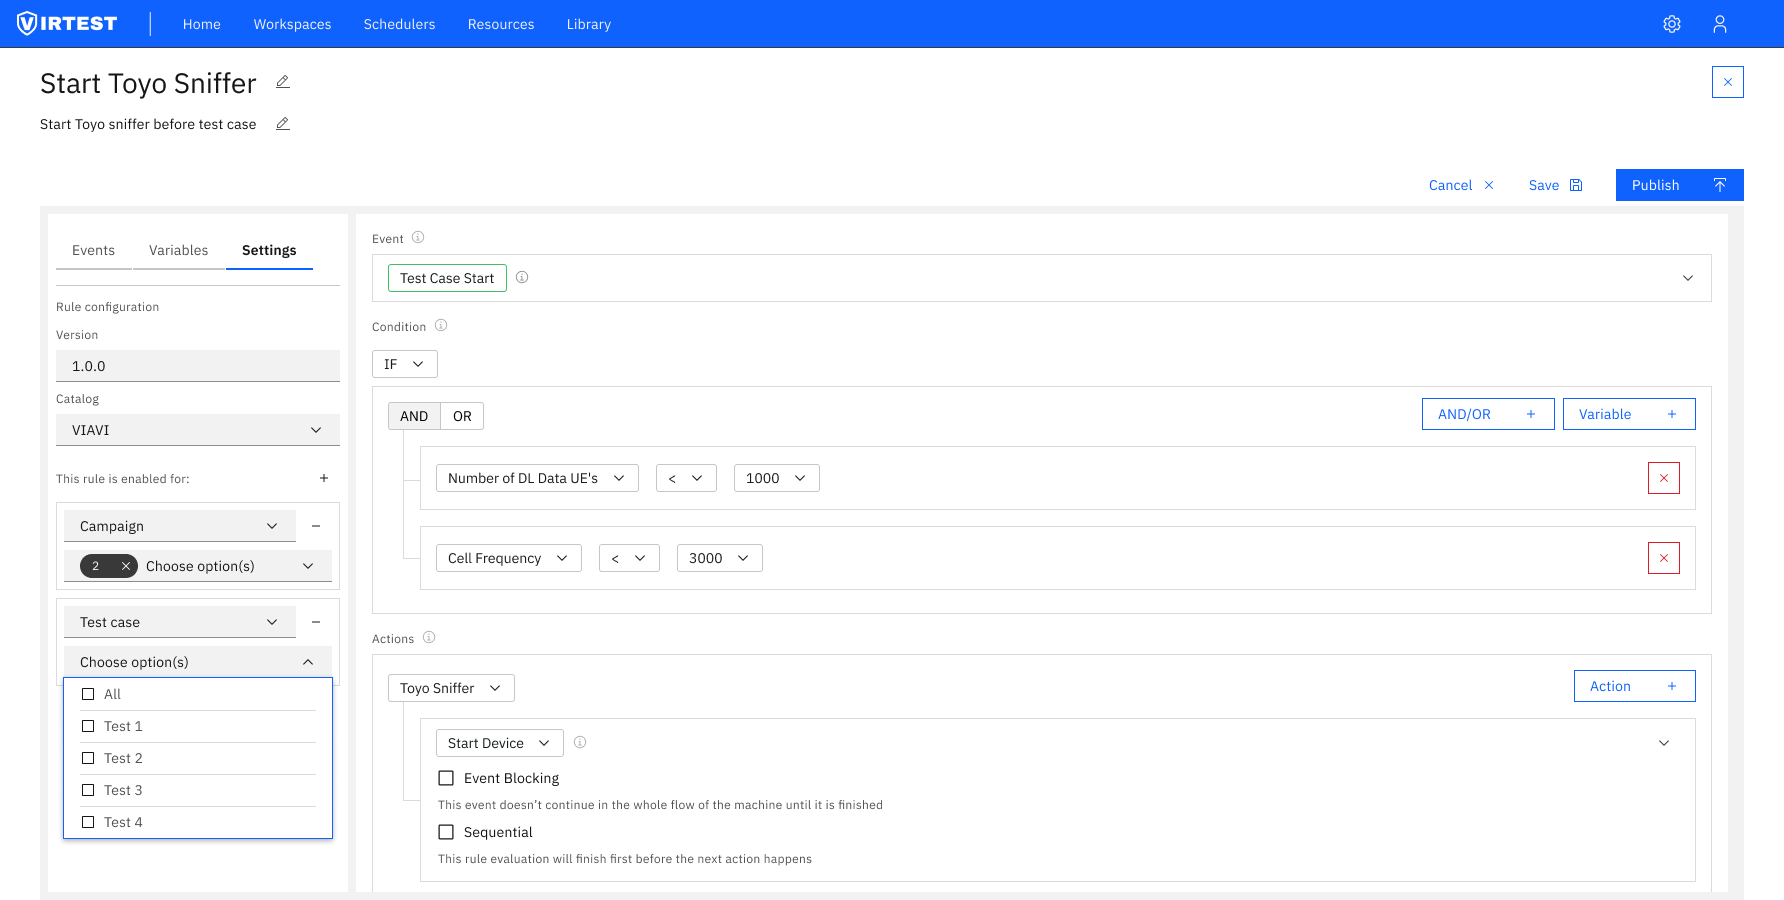
Settings tab: version 1.0.0, Catalog VIRTUAL. "This rule is enabled for" section scopes the rule to specific Campaigns and Test Cases via multi-select. Rules can be restricted to exactly the contexts where they're relevant.
04 — Key Design Principles
Structure is usability
Complex automation tools feel overwhelming when everything is visible at once. The tabbed left panel (Events / Variables / Settings) and sequential canvas structure ensure users focus on one conceptual task at a time. The structure itself reduces cognitive load.
Constraints empower
Only one event per rule. Only checked variables appear in condition dropdowns. Only lab-configured equipment appears in action dropdowns. Every constraint removes a category of error without removing capability for users who know what they need.
Progressive disclosure
The Event parameter table is collapsed until needed. Advanced options like Event Blocking and Sequential execution are secondary. "Use variable" checkboxes only appear where variable substitution makes sense. Depth is always available, but never in the way.
Save vs Publish distinction
Local save protects the workspace. Publishing to the shared library is a deliberate, separate action. The Publish button becoming active only when the rule is complete serves as implicit validation, no error message, just a clear signal that the work is done.
4
Sequential steps from trigger to publish
5
Action types per equipment
3
Scope levels - workspace campaign test case
4
Sequential steps from trigger to publish
5
Action types per equipment
3
Scope levels - workspace campaign test case
05 — Outcomes
Rule Maker expanded automation access beyond the engineering subset who could write scripts, any team member familiar with the test environment could build and publish rules without developer involvement. This directly increased rule adoption and the size of the shared library.
Fewer configuration errors reached the test execution stage. The constrained input model: scoped variable selection, sequential steps, Publish-as-validation caught most mistakes at the point of creation rather than at runtime. Engineers reported higher confidence that a rule would behave as expected before running it.
The shared library model improved team reuse. Rules created once could be published and applied across multiple campaigns and test cases, reducing redundant setup work and ensuring consistent automation behavior across the organization.
"The most important design decision wasn't a UI pattern, it was treating the rule editor as a decision-making environment. Every constraint, every sequential step, every disabled button exists to make the decision space smaller and the outcome more predictable."
06 — Lessons Learned
Designing for operational risk requires stronger guardrails than typical enterprise UX. When a rule fires incorrectly during a live test, the consequences are real, equipment starts or stops at the wrong time, test data becomes invalid, schedules slip. The design had to earn trust by making the rule's behavior predictable and auditable at every step.
The query builder pattern proved its value. Rather than inventing a new interaction paradigm for the condition builder, we referenced a well-understood pattern (query builders used in BI tools and analytics platforms). This let engineers onboard faster because the mental model was already familiar, even in an unfamiliar domain.
Separating logic from metadata reduces mental overload. The Settings tab deliberately handles only rule metadata, version, catalog, scope. Putting versioning and publishing alongside condition logic would have created a context-switching problem. Keeping them separate meant engineers could complete the logic first and handle publishing as a distinct, intentional step.